This extension is currently under active development. While code is complete, this documentation may be missing some aspects and will evolve over time.
Luma Matrix Workshop
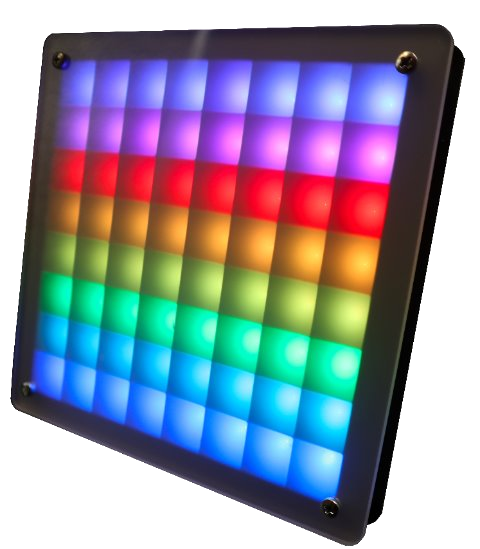
| The Luma Matrix is a Workshop by ZHAW to play and create with coding. The center of the workshop is an 8 by 8 pixel matrix controlled with a micro:bit. Use the blocks from the extension to build whatever you have in mind. Draw images, show text, display the time, or even connect it to other Luma Matrices. |
|
Hardware
The extension is built around a custom PCB with an 8x8 LED matrix, paired with a 3d printed frame and a plastic diffuser. The hardware is not available for sale but can be built on your own. Design files are available in InES-HPMM/LED-Matrix-Workshop with gerber for PCB order.
If you like to build your own Luma Matrix experience using off-the-shelf components, follow the guide in the Build your own Luma Matrix section.
Using these blocks requires the micro:bit V2 hardware. On a micro:bit v1 board, you will see memory errors with 9xx error code on the screen.

Use as extension
This repository can be added as an extension in MakeCode.
- Open https://makecode.microbit.org/
- Click on New Project
- Click on Extensions under the gear menu
- Search for https://github.com/ines-hpmm/pxt-luma-matrix and import
Build your own Luma Matrix
Building your own Luma Matrix requires some advanced knowledge in electronics and soldering. The guide assumes you have experience with these topics. If you are not familiar with these topics, start with a simpler project to build your skills.
The extension allows to render graphics for a 8x8 NeoPixel Matrix using MakeCode. The matrix can be used to display images, text, and control individual pixels. You can build your own Luma Matrix experience using off-the-shelf components according to schematics and parts list below. Alternatively, the design files for the custom PCB are available in InES-HPMM/LED-Matrix-Workshop with gerber for PCB order.
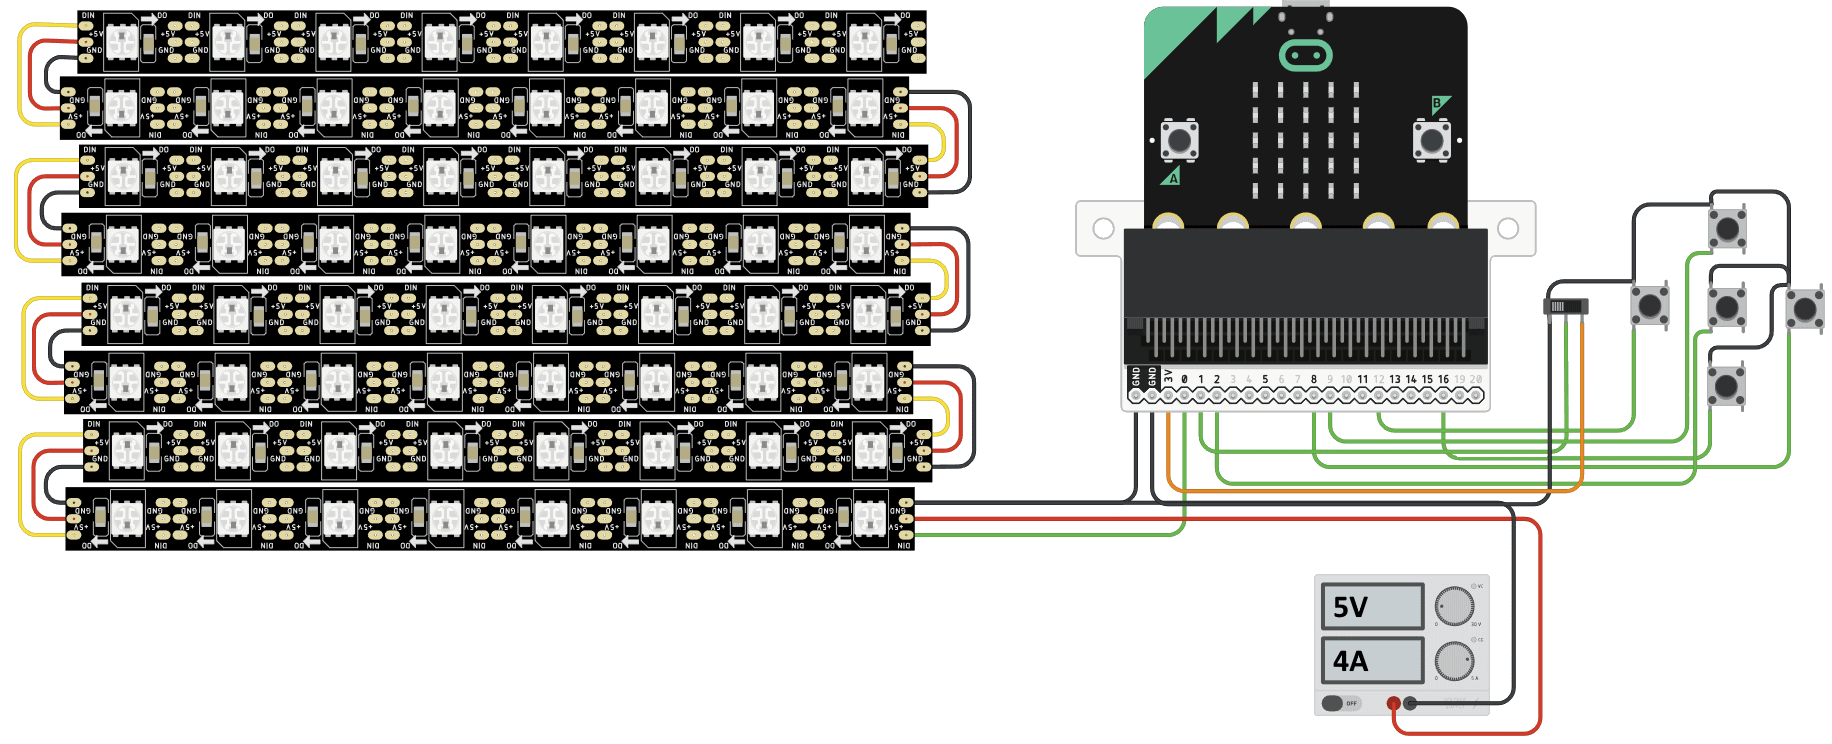
Parts List
| Part | Description | Link |
|---|---|---|
| micro:bit v2 | Microcontroller to be programmed with MakeCode | micro:bit |
| 8x8 RGB NeoPixel Matrix | 8x8 grid array of RGB Neopixels. Can be single PCB with pixels or a chained set of strips. | Adafruit |
| 5V Power Supply | Power source capable of delivering 5V / 4A or more | Adafruit |
| DC Barrel Jack to Alligator Clips | Connect power supply to matrix | Adafruit |
| Wires for connection | Alligator Clips or similar | Adafruit |
| Joystick (optional) | Arcade Joystick, Input device for the micro:bit | Adafruit |
| Switch (optional) | SPDT Toggle Switch, Input device for the micro:bit | Adafruit |
Connection
Note: Do not connect the matrix VCC directly to the micro:bit 3V. The matrix requires more power than the micro:bit can provide.
Logic Level: Neopixels work better with 5V logic. The micro:bit uses 3.3V logic. The matrix will work with 3V level, but adding a logic level shifter between P0 and LED will improve stability. Consider this Guide from Adafruit for more detailed information regarding neopixel power and logic level.
- Flash the micro:bit with the built code using MakeCode
- Connect Matrix GND to micro:bit GND
- Connect Matrix GND to GND of external power supply
- Connect Matrix DIN to micro:bit P0
- Connect Matrix VCC to VCC of external 5V power supply
- Connect micro:bit to computer using USB cable
If you want to also use the input methods, connect a switch and a joystick to the micro:bit. The inputs are required for example in snake game
- Switch
- Connect one side of the switch to micro:bit 3V
- Connect the other side of the switch to micro:bit GND
- Connect the middle pin of the switch to micro:bit P1
- Joystick
- Center button to P2
- Up button to P9
- Down button to P16
- Right button to P8
- Left button to P12
Challenges
In diesem Kapitel werden wir einige Herausforderungen mit der Lumatrix angehen. Diese Herausforderungen sind darauf ausgelegt, dir zu helfen, die Grundlagen der Programmierung mit der Lumatrix zu erlernen und deine Fähigkeiten zu verbessern. Jede Herausforderung wird eine kurze Beschreibung der Aufgabe enthalten.
Je nach Aufgabe wird dir eine Vorlage zur Verfügung gestellt, die du verwenden kannst, um deine Lösung zu erstellen. Du kannst die Vorlage kopieren und erweitern, um deine eigene Lösung zu erstellen.
Auf geht's! 🤖🛠️🕹️
Teilweise werden in den Aufgaben Blöcke angezeigt, die dir helfen können, die Aufgabe zu lösen. Diese Blöcke sind nicht vollständig und es gibt oft auch andere Wege.
Erweiterungen (Bitte Aufklappen)
Erweiterungen (Bitte Aufklappen)
Wenn du schnell bist, kannst du gerne die Erweiterungen in der jeweiligen Aufgabe ausprobieren.
Challenge 1 - Makecode
Die Lumatrix kann mit dem Makecode-Editor programmiert werden. In dieser Challenge wirst du lernen, wie du die Lumatrix mit Makecode programmieren kannst. Du wirst mit einer einfachen Vorlage beginnen, die dir zeigt, was möglich ist und wie das programmieren funktioniert.
Aufgabe
- Öffne das MakeCode-Projekt über den Link oder klicke auf den "Bearbeiten"-Button im Fenster unten.
- Verbinde die Lumatrix mit dem Computer über das USB-Kabel.
- Kopple die Lumatrix mit dem PC und lade den Code auf die Lumatrix herunter.
- Schaue was passiert und versuche die Blöcke zu verstehen. Was macht der Joystick?
Challenge 1.1 - Hallo Lumatrix
In dieser Challenge werden wir die Lumatrix verwenden, um eine einfache Nachricht anzuzeigen. Auf dem LED-Matrix-Display können wir Text, Bilder und Animationen anzeigen. Wir werden die Lumatrix verwenden, um einen einfachen Text anzuzeigen, der auf dem Display scrollt.
Aufgabe
- Öffne das MakeCode-Projekt Hallo Lumatrix
- Lade den Code auf die Lumatrix herunter.
- Schalte die Lumatrix ein und beobachte
- Verändere den Text um deine eigene Nachricht anzuzeigen.
- Lade den Code erneut auf die Lumatrix herunter.
Challenge 2 - Lampe
Deine Lumatrix sollte wie eine Lampe funktionieren. Verwende den Schiebeschalter auf der Rückseite als Lichtschalter. Eingeschaltet bedeutet, dass alle LEDs in der Matrix aufleuchten sollten. Ausgeschaltet bedeutet, dass alle LEDs dunkel sind. Verwende den Block „Pixel setzen“ aus der Luma Matrix Erweiterung. Welche Schleife ist am besten geeignet, um diese Aufgabe zu lösen?
Diese Blöcke können hilfreich sein
lumaMatrix.switchValueChangedThread(function (state) {

})

if (lumaMatrix.isSwitchSet(true)) {

} else {

}
Erweiterung 1
Erweiterung 1
Erstelle ein Blinklicht, so dass alle LEDs in der Matrix blinken wenn der Schalter eingeschaltet ist.
Challenge 3 - Countdown
Programmiere einen Timer, der die Zeit herunterzählt und dabei den Fortschritt anzeigt. Du bist dabei frei, wie die verbleibende Zeit anzeigen möchtest.
Vorschläge für Zeitdarstellung
Vorschläge für Zeitdarstellung
- Verbleibende Sekunden als Zahl darstellen
- Fortschritt als Balken darstellen
- Farben verwenden, um den Fortschritt darzustellen
- Kombination aus verschiedenen Möglichkeiten
- ...
Aufgabe
- Öffne oder erstelle ein MakeCode-Projekt mit der Lumatrix Erweiterung luma-matrix
- Programmiere einen Countdown-Timer, von z.B. 20 Sekunden auf 0 Sekunden.
- Nach abgelaufener Zeit soll ein Bild oder eine Animation angezeigt werden.
- Du kannst den Countdown mit dem Joystick starten und stoppen.
- Programmiere die Fortschrittsanzeige, so dass der Timerfortschritt abgeschätzt werden kann.
- Ergänze den Countdown mit weiteren Funktionen, wie z.B. einer Pause-Funktion oder einer Reset-Funktion.
Challenge 4 - Drahtlose Kommunikation
Der pico:bit auf der Rückseite der Lumatrix kann auch drahtlos kommunizieren. In dieser Challenge wirst du lernen, wie du die Lumatrix mit einem anderen pico:bit kommunizieren lassen kannst. Die Kommunikation efolgt über das 2.4 GHz Frequenzband, also wie WLAN und Bluetooth.
Blöcke
MakeCode bietet in der Kategorie Funk eigene Blöcke zum senden von Zahlen oder Textnachrichten. In der Kategorie "Kommunikation" der Luma Matrix Erweiterung findest du die Blöcke zum Senden und Empfangen von Daten relevant für die Lumatrix. Die jeweiligen Blöcke enthalten ein eigenes Protokoll um zu definieren, was gesendet wird.
- Bitmap: Ein Bild, das zeigt welche LEDs leuchten sollen. Die Farbe für alle wird dabei mitgesendet.
- Farbbild: Ein Bild, das zeigt welche LEDs leuchten sollen und in welcher Farbe.
- Pixel (x,y): Ein einzelnes Pixel, das leuchten soll. Die Farbe wird mitgesendet.
- Unbekannt: Alle anderen Daten, die nicht in die anderen Kategorien passen können so manuell definiert werden.
Erläuterung zum Senden
Erläuterung zum Senden
Bitmap: Sende Bild 8x8 in Farbe
- Sende welche Pixel in der definierten Farbe leuchten sollen. Als optionaler Parameter "Layer" kannst du angeben, ob das Bild das vorherige Bild ergänzen oder ersetzen soll.
Farbbild: Sende Pixel Buffer (komprimiert)
- Dieser Block sendet einen "Screenshot" der Lumatrix in reduzierter Farbauflösung. Die Farben werden auf Rot, Orange, Gelb, Grün, Blau, Violett, Weiss, Schwarz reduziert. Der Pixel Buffer ist der aktuelle Zustand der Lumatrix.
Pixel: Sende Pixel (x,y) in Farbe
- Sende ein einzelnes Pixel in der definierten Farbe. Die Farbe wird mitgesendet
Erläuterung zum Empfangen
Erläuterung zum Empfangen
Empfang-Event (Interrupt): Wenn Matrix Buffer empfangen (dataType, receivedBuffer)
- Dieser Block wird aufgerufen, wenn ein Bild empfangen wurde. Zwei Parameter werden mitgesendet.
- dataType: Der Typ der Nachricht, die empfangen wurde
- receivedBuffer: Der Buffer, der die Daten enthält. Aus diesem Buffer kannst du die Daten extrahieren.
Bitmap: Extrahiere Bild aus Buffer
- Dieser Block extrahiert die Bitmap-Daten aus dem Buffer. Du kannst die Daten dann verwenden, um das Bild auf der Lumatrix anzuzeigen.
Bitmap: Extrahiere Farbe aus Buffer
- Dieser Block extrahiert die Farbe aus dem Buffer. Du kannst die Farbe dann verwenden, um das Bild auf der Lumatrix anzuzeigen.
Bitmap: Extrahiere Layer aus Buffer
- Dieser Block extrahiert den Layer aus dem Buffer. Du kannst den Layer dann verwenden, um das Bild auf der Lumatrix anzuzeigen.
Extrahiere RGB-Bild aus Buffer
- Dieser Block extrahiert die RGB-Daten aus dem Buffer. Du kannst die Daten dann verwenden, um das Bild auf der Lumatrix anzuzeigen.
Pixel (x,y): Setze empfangenen Pixel aus Buffer
- Dieser Block extrahiert die Pixel-Daten aus dem Buffer und setzt den Pixel auf der Lumatrix.
Aufgabe
- Suche dir einen Team-Partner mit einer weiteren Lumatrix.
- Erstelle ein neues Projekt, adaptiere ein vorhanenes Projekt oder nutze die Vorlage aus Challenge 1.
- Setze deine Lumatrix und die von deinem Partner auf den selben Kanal.
- Nutzen den Jostick um je nach Richtung ein Bild an deinen Partner zu senden.
- Dein Partner soll das Empfangen
radio.setGroup(25)
lumaMatrix.initializeMatrix(127)

lumaMatrix.onReceivedMatrix(function (dataType, receivedBuffer) {
    if (dataType == lumaMatrix.getDataType(lumaMatrix.eDataType.Bitmap)) {

    }
})
Challenge 5 - Cursor
In dieser Aufgabe wirst du den Joystick verwenden, um eine LED auf der Lumatrix "wandern" zu lassen - wie eine Computermaus. Du kannst den Joystick in alle vier Richtungen bewegen, um die LED zu steuern. Wenn du den Joystick nach oben bewegst, wird die LED nach oben wandern und so weiter.
Aufgabe
Nutze die Vorlage Lumatrix-Cursor um einen Pixel in der Farbe deiner Wahl auf der Lumatrix zu bewegen. Du kannst den Joystick in alle vier Richtungen bewegen, um die LED zu steuern. Es soll möglich sein, die LED in alle vier Richtungen zu bewegen. Wenn du den Joystick nach oben bewegst, wird die LED nach oben wandern und so weiter. Alle anderen LEDs sollen dabei dunkel bleiben.
Suche dir passende Blöcke aus, um die Bewegung des Joysticks in bewegung der LED umzuwandeln.
Achte dabei darauf:
- Was passiert mit dem Pixel der zuvor leuchtete?
- Was passiert, wenn der Cursor den Rand der Lumatrix erreicht?
Erweiterung 1
Erweiterung 1
Nutze den Schalter um die Spur des Cursors ein- und auszuschalten. So kannst du auf der Lumatrix zeichnen.
Erweiterung 2
Erweiterung 2
Die Tasten A und B sind noch nicht belegt. Nutze die Tasten um die Farbe des Cursors zu ändern. Du brauchst vermutlich eine Variable, um die Farbe zu speichern.
Erweiterung 3
Erweiterung 3
Nutze das Funkmodul und lasse deiner Kreativität freien Lauf. Zum Beispiel kannst du die Farbe des Cursors einer anderen Lumatrix ändern.
Vorlage
Docs
This section contains documentation for the blocks available in the Luma Matrix extension. The blocks are divided into categories based on their functionality.
Pixels
Pixels blocks are used to control the LEDs on the matrix.
Initilization
Initialize the matrix with the pin and brightness. The brightness can be set from 0 to 255. The default brightness is 127. This function needs to be called before any other function which interacts with the matrix.
lumaMatrix.initializeMatrix(127)
Set Brightness
Set the brightness of the LEDs. The brightness can be set from 0 to 255. The default brightness is 127.
lumaMatrix.setBrightness(255)
Show Image
Draw an image in a specific color on the matrix. The image is a string of 64 characters, each representing a pixel on the matrix. The color is a hex value. The selcted pixels will be added to the matrix and displayed along with the existing pixels.
lumaMatrix.showImage(lumaMatrix.matrix8x8(`
    . . . . . . . .
    . . . . . . . .
    . . # . . # . .
    . . . . . . . .
    . . . . . . . .
    . # . . . . # .
    . # # # # # # .
    . . . . . . . .
    `), 0x00ff00)
Inputs
On the back of th matrix there are two inputs, a joystick and a switch.
Read GPIO
Read the value from a specified GPIO pin.
let gpioValue = lumaMatrix.readGPIO(DigitalPin.P1)
Read Switch
Read the current value of the switch.
let switchValue = lumaMatrix.readSwitch()
Check if Switch is Set
Check if the switch is set.
let isSwitchSet = lumaMatrix.isSwitchSet(true)
Read Joystick Direction
Read the current direction of the joystick.
let joystickDirection = lumaMatrix.readJoystick()
Read Joystick Direction as Text
Read the current direction of the joystick as text.
let joystickDirectionText = lumaMatrix.readJoystickText()
Compare Joystick Direction
Compare the current joystick direction with a specified direction.
let isJoystickDown = lumaMatrix.compareJoystick(joystickDirection, lumaMatrix.eJoystickDirection.Down)
Joystick Direction Changed Callback
Execute a callback function when the joystick direction changes.
lumaMatrix.joystickChangedThread(() => {
  console.log("Joystick direction changed")
})
Joystick Direction Specific Callback
Execute a callback function when the joystick moves in a specified direction.
lumaMatrix.joystickDirectionThread(lumaMatrix.eJoystickDirection.Up, () => {
  console.log("Joystick moved up")
})
if (lumaMatrix.compareJoystick(lumaMatrix.readJoystick(), lumaMatrix.eJoystickDirection.Down)) {
    lumaMatrix.setOnePixel(7, 0, 0xffff00)
}
Clock
Create Word Clock
Create a clock thread to track time and light up specific LEDs to display the time.
lumaMatrix.createWordClock(
lumaMatrix.eMatrixVersion.V2,
0x007fff,
0xffff00,
0x00ff00
)
Communication Blocks
The Luma Matrix extension provides blocks for wireless communication between multiple micro:bit devices equipped with Luma Matrix displays. This allows you to send images and color patterns from one device to another using the micro:bit's built-in radio capabilities.
Setting Up Communication
Before using any communication blocks, you need to set up the radio channel on both the sending and receiving micro:bits. All devices that want to communicate must be on the same radio channel.
radio.setGroup(1)
Available Communication Blocks
Send Image with Color
This block allows you to send a monochrome bitmap image with a specified color to another Luma Matrix. The receiving device will display the image in the chosen color.
Example usage:
lumaMatrix.sendImageWithColor(lumaMatrix.matrix8x8(`
        . . . . . . . .
        . # # . . # # .
        . # # . . # # .
        . . . . . . . .
        # . . . . . . #
        . # . . . . # .
        . . # . . # . .
        . . . # # . . .
        `), 0xff0000)
Send Compressed Pixel Buffer
This block sends a full-color image by compressing the pixel buffer before transmission. This is useful when you want to send images with multiple colors.
Example usage:
lumaMatrix.sendPixelBuffer(lumaMatrix.getPixelBuffer())
Receive Matrix Data
This block sets up an event handler that triggers whenever matrix data is received over radio. The handler provides two parameters:
dataType: Indicates whether the received data is a bitmap (1) or RGB image (2)receivedBuffer: The actual data buffer containing the image information
Example usage:
lumaMatrix.onReceivedMatrix(function (dataType, receivedBuffer) {
    if (dataType == 1) {
        let image = lumaMatrix.parseImage(receivedBuffer)
        let color = lumaMatrix.parseBufferForColor(receivedBuffer)
        lumaMatrix.showImage(image, color)
    } else if (dataType == 2) {
        lumaMatrix.showPixelBuffer(lumaMatrix.parseColorImage(receivedBuffer))
    }
})
Color Palette
For efficient communication, you can use predefined colors from the color palette:
- Red
- Green
- Blue
- Orange
- Yellow
- Purple
- White
- Black
Example using color palette:
lumaMatrix.sendImageWithColor(myImage, lumaMatrix.getColorPalette(lumaMatrix.eColorPalette.Yellow))
Technical Details
The communication protocol uses data compression to efficiently transmit images:
- Monochrome images are compressed to 8 bytes (1 bit per pixel)
- Color information is sent as RGB values (3 bytes)
- Full RGB images are compressed from 192 bytes to 24 bytes
- Large buffers are split into two packets for reliable transmission
Tips and Best Practices
- Always ensure all devices are on the same radio channel
- Add a small delay (1-2ms) between sending multiple packets
- Consider using the predefined color palette for more efficient communication
- Handle both bitmap and RGB image types in your receive handlers
- Test communication in areas with minimal radio interference
Troubleshooting
If you experience issues with communication:
- Verify that all devices are on the same radio channel
- Check if the devices are within range (typically 10-20 meters)
- Ensure the sending device has completed transmission before sending the next image
- Monitor the serial output for debugging messages
- Consider reducing the radio group number if there's interference
Example Project
Light up every pixel
This example lights up every pixel of the matrix in yellow, one by one.
lumaMatrix.initializeMatrix(127)
basic.forever(function () {
    for (let y = 0; y <= 7; y++) {
        for (let x = 0; x <= 7; x++) {
            lumaMatrix.setOnePixel(x, y, 0xffff00)
            basic.pause(100)
        }
    }
    basic.pause(1000)
    lumaMatrix.clear()
})
Draw an Image
This example draws a heart on the matrix, color and position is depnding on the switch state.
lumaMatrix.initializeMatrix(127)
basic.forever(function () {
    if (lumaMatrix.isSwitchSet(true)) {
        lumaMatrix.showImage(lumaMatrix.matrix8x8(`
            . . . . . . . .
            . # # . # # . .
            # # # # # # # .
            # # # # # # # .
            # # # # # # # .
            . # # # # # . .
            . . # # # . . .
            . . . # . . . .
            `), 0xff0000)
    } else {
        lumaMatrix.showImage(lumaMatrix.matrix8x8(`
            . . . . . . . .
            . . # # . # # .
            . # # # # # # #
            . # # # # # # #
            . # # # # # # #
            . . # # # # # .
            . . . # # # . .
            . . . . # . . .
            `), 0xff8000)
    }
})
Countdown
A countdown timer can be visualized in multiple ways.
Text-based countdown
This example shows the remaining seconds as scrolling numbers.
input.onButtonPressed(Button.A, function () {
    counter = 60
})
let counter = 0
lumaMatrix.initializeMatrix(127)
counter = -1
lumaMatrix.showImage(lumaMatrix.matrix8x8(`
    . . # # # # . .
    . # . . . . # .
    # . . . . . . #
    # . . . . . . #
    # . . . . . . #
    # . . . . . . #
    . # . . . . # .
    . . # # # # . .
    `), 0xffffff)
lumaMatrix.showImage(lumaMatrix.matrix8x8(`
    . . . . . . . .
    . . . # . . . .
    . . . # . . . .
    . . . # . . . .
    . . . # # . . .
    . . . . . # . .
    . . . . . . . .
    . . . . . . . .
    `), 0xff8000)
loops.everyInterval(1000, function () {
    if (counter > 0) {
        lumaMatrix.scrollText(convertToText(counter), 0x00ff00, 90)
        counter += -1
    } else if (counter == 0) {
        lumaMatrix.scrollText("Time is up", 0xff0000, 90)
        counter = -1
    } else {
        lumaMatrix.showImage(lumaMatrix.matrix8x8(`
            . . # # # # . .
            . # . . . . # .
            # . . . . . . #
            # . . . . . . #
            # . . . . . . #
            # . . . . . . #
            . # . . . . # .
            . . # # # # . .
            `), 0xffffff)
        lumaMatrix.showImage(lumaMatrix.matrix8x8(`
            . . . . . . . .
            . . . # . . . .
            . . . # . . . .
            . . . # . . . .
            . . . # # . . .
            . . . . . # . .
            . . . . . . . .
            . . . . . . . .
            `), 0xff8000)
    }
})
Progress bar countdown
A different approch would be to visualize the countdown as a kind of progress bar using all pixels.
input.onButtonPressed(Button.A, function () {
    counter = counter_time
})
let index = 0
let progress = 0
let counter_time = 0
let counter = 0
lumaMatrix.initializeMatrix(127)
counter = -1
counter_time = 60
let num_leds = 64
lumaMatrix.showImage(lumaMatrix.matrix8x8(`
    . . # # # # . .
    . # . . . . # .
    # . . . . . . #
    # . . . . . . #
    # . . . . . . #
    # . . . . . . #
    . # . . . . # .
    . . # # # # . .
    `), 0xffffff)
lumaMatrix.showImage(lumaMatrix.matrix8x8(`
    . . . . . . . .
    . . . # . . . .
    . . . # . . . .
    . . . # . . . .
    . . . # # . . .
    . . . . . # . .
    . . . . . . . .
    . . . . . . . .
    `), 0xff8000)
loops.everyInterval(1000, function () {
    if (counter > 0) {
        progress = Math.map(counter, 0, counter_time, 0, num_leds)
        for (let y = 0; y <= 7; y++) {
            for (let x = 0; x <= 7; x++) {
                index = y * 8 + x
                if (index < progress) {
                    lumaMatrix.setOnePixel(x, y, 0xffff00)
                } else {
                    lumaMatrix.setOnePixel(x, y, 0x000000)
                }
            }
        }
        counter += -1
    } else if (counter == 0) {
        lumaMatrix.scrollText("Time is up", 0xff0000, 90)
        counter = -1
    } else {
        lumaMatrix.showImage(lumaMatrix.matrix8x8(`
            . . # # # # . .
            . # . . . . # .
            # . . . . . . #
            # . . . . . . #
            # . . . . . . #
            # . . . . . . #
            . # . . . . # .
            . . # # # # . .
            `), 0xffffff)
        lumaMatrix.showImage(lumaMatrix.matrix8x8(`
            . . . . . . . .
            . . . # . . . .
            . . . # . . . .
            . . . # . . . .
            . . . # # . . .
            . . . . . # . .
            . . . . . . . .
            . . . . . . . .
            `), 0xff8000)
    }
})
Cursor
Computers have a mouse, the Luma Matrix has a joystick. This example shows how to move a cursor on the matrix using the joystick. The cursor is represented by a yellow pixel. The cursor can be moved up, down, left, and right. When the joystick is pressed, the cursor is reset to the top left corner of the matrix.
function moveCursor (direction: number) {
    if (direction == lumaMatrix.getJoystickDirectionEnum(lumaMatrix.eJoystickDirection.Up)) {
        cursor_y += -1
    } else if (direction == lumaMatrix.getJoystickDirectionEnum(lumaMatrix.eJoystickDirection.Down)) {
        cursor_y += 1
    } else if (direction == lumaMatrix.getJoystickDirectionEnum(lumaMatrix.eJoystickDirection.Left)) {
        cursor_x += -1
    } else if (direction == lumaMatrix.getJoystickDirectionEnum(lumaMatrix.eJoystickDirection.Right)) {
        cursor_x += 1
    } else if (direction == lumaMatrix.getJoystickDirectionEnum(lumaMatrix.eJoystickDirection.Center)) {
        cursor_x = 0
        cursor_y = 0
    } else {
        cursor_x = (cursor_x + 8) % 8
        cursor_y = (cursor_y + 8) % 8
    }
}
lumaMatrix.joystickChangedThread(function (direction) {
    lumaMatrix.setOnePixel(cursor_x, cursor_y, 0x000000)
    moveCursor(direction)
    lumaMatrix.setOnePixel(cursor_x, cursor_y, 0xffff00)
})
let cursor_y = 0
let cursor_x = 0
cursor_x = 0
cursor_y = 0
lumaMatrix.initializeMatrix(127)
lumaMatrix.setOnePixel(cursor_x, cursor_y, 0xffff00)
Pong Game
This is a simple multiplayer Pong game that can be played with two luma matrices connected over the same radio channel. The game is played by moving the paddles up and down to hit the ball. The first player to score 7 points wins the game.
Setup
- Open the MakeCode project Luma Pong
- Set the radio channel to a desired number (default is 8). This must be the same for both players and should be a different channel than other Luma Matrices around may be using.
- Download the same code to both Luma Matrices. Make sure to select the correct board in the MakeCode editor.
- Player 1 (host) can be selected by turning on the switch SW1 (right) on the Luma Matrix. Player 2 (guest) can be selected by turning off the switch SW1 (left) on the Luma Matrix.
- The game runs as soon as host is started.
- Button A is used to restart the game
Challenge X - Template
Introduction to the challenge. Program this and that to do this and that.
lumaMatrix.switchValueChangedThread(function (state) {

})

if (lumaMatrix.isSwitchSet(true)) {

} else {

}